Using the new GUI for SmartFabric VxRail Deployment

In the last SmartFabric blog I covered how to enable SmartFabric on your Dell OS10 switch and to declare the personality. Building out a new SmartFabric VxRail cluster from a greenfield install requires two Top of Rack switches with the Leaf personality. Once this task is done, simply rebooting the ToRs will give you access to the GUI where everything required to setup the new fabric is achieved. This could not be simpler.

Login to SmartFabric VxRail Master

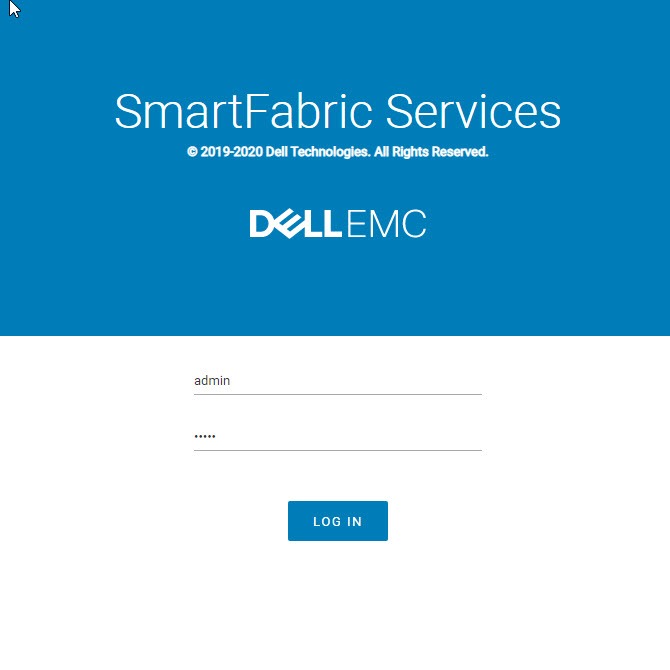
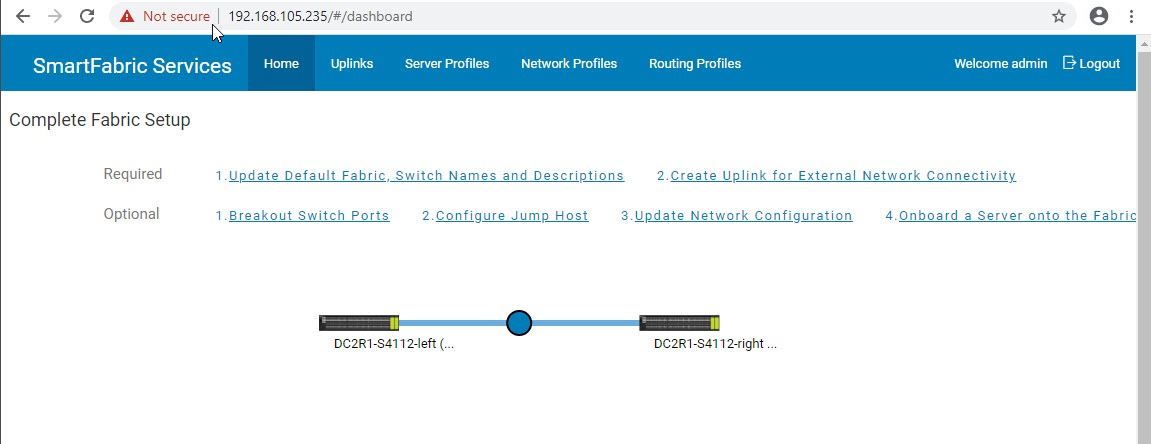
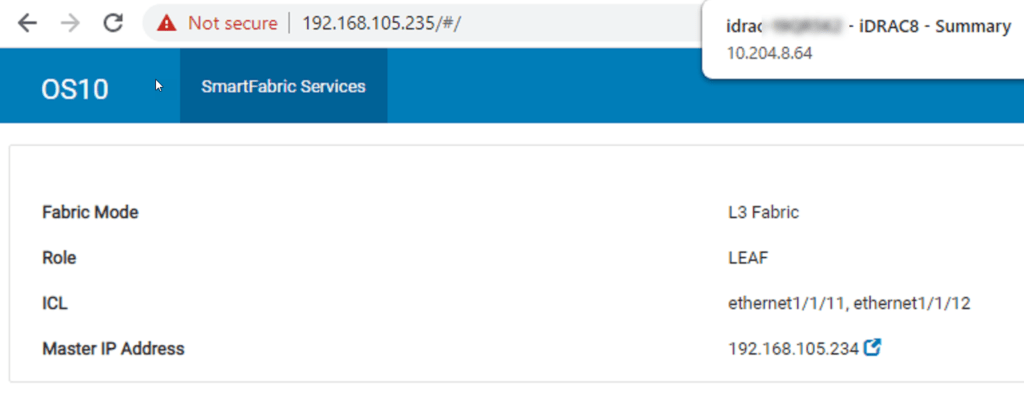
In the last step of the previous blog we setup the ICL ports between the Leafs and triggered an election by rebooting them. Now we need to logon to the Master switch of the new Leaf pair. If you hit the wrong one, you will be presented with the view below and know you are on the secondary. Just click the link on the ip address to reach the Master.

We can logon to the SmartFabric VxRail master by the default username/password of admin/admin. Here we are presented with the dashboard. There are two required steps to perform here.

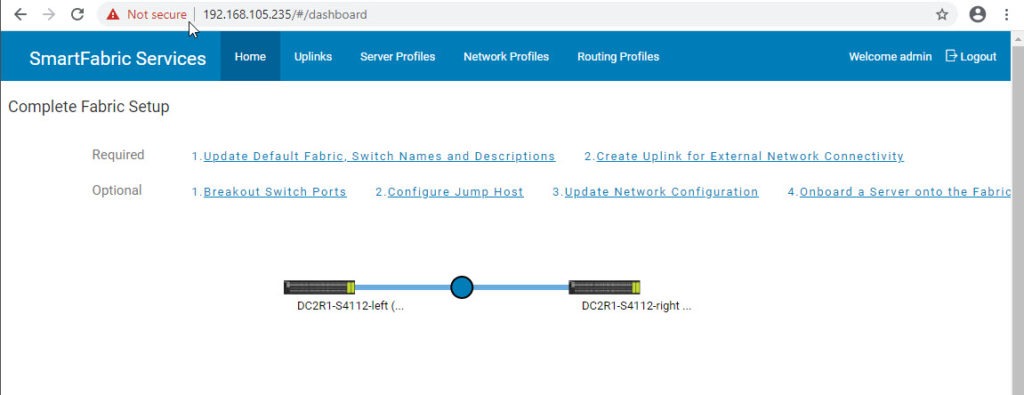
Complete Fabric Setup

We can already see that the two Leaf switches have begun the initial fabric creation. The new topology shows the ICL connections. The first required step before we deploy SmartFabric VxRail is to Update Default Fabric Switch Names and Descriptions.

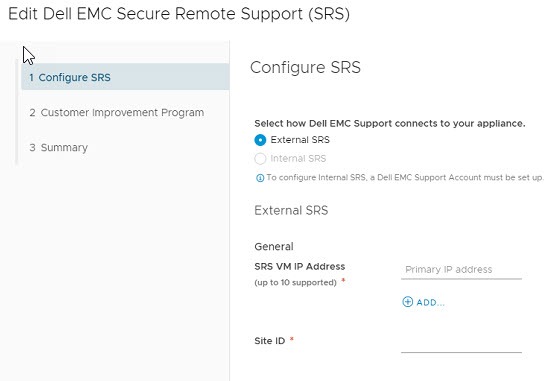
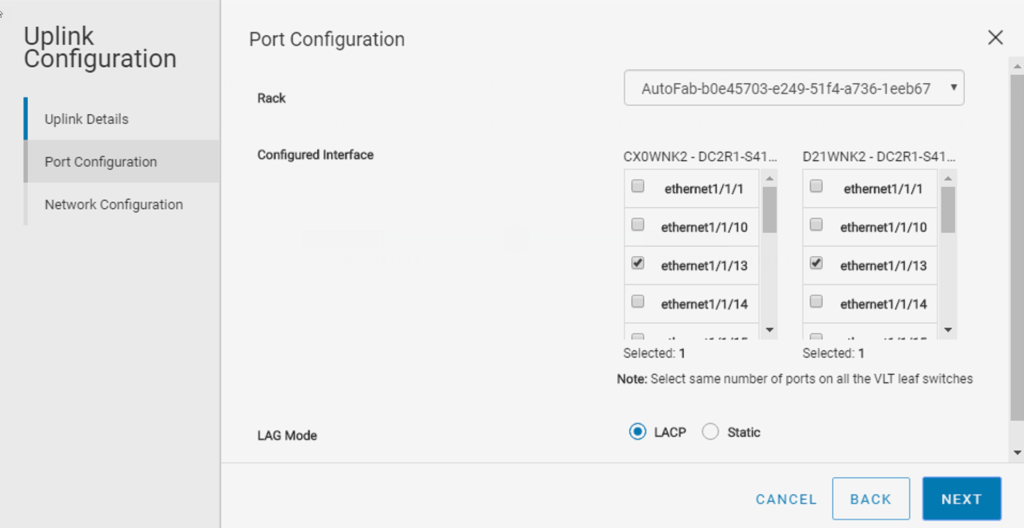
The second required step is to configure Uplinks. You have choice to setup Layer 2 or Layer 3 uplinks here. This can be changed later, but required for the VxRail deployment so you can reach DNS and NTP services normally. Add the Management network on the last step to reach these services outside of the VxRail rack.

Optional Settings

You are ready to deploy VxRail at this stage unless you require a few optional steps. You might need to make a few changes if your setup falls outside the default port speeds for example.
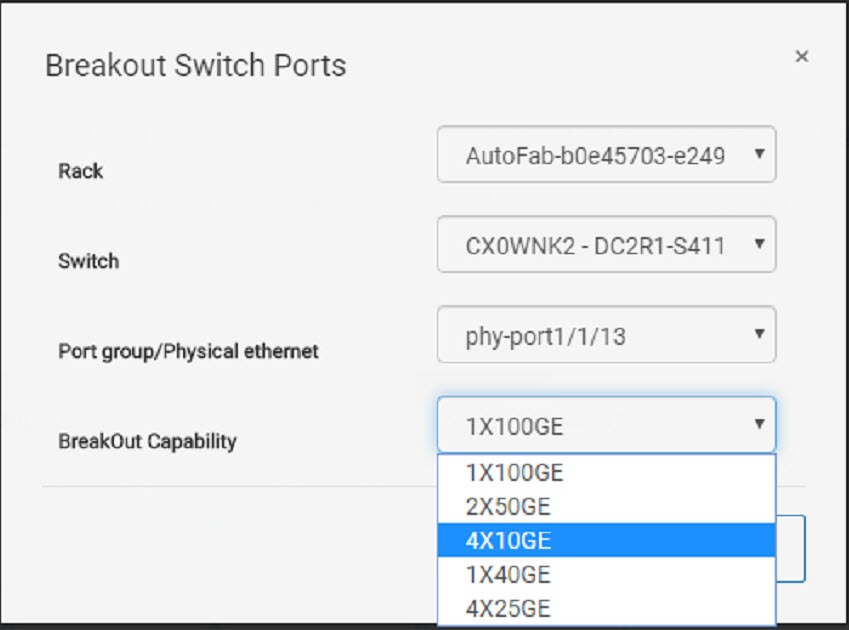
Configure Breakouts

You can change the uplinks speed from the default port speed (100GB). There are several options available depending on the switch you choose and the port you end up using. You might also need to adjust the Jump port speed if you plan to use a 1GB laptop nic in a 25GB switch.
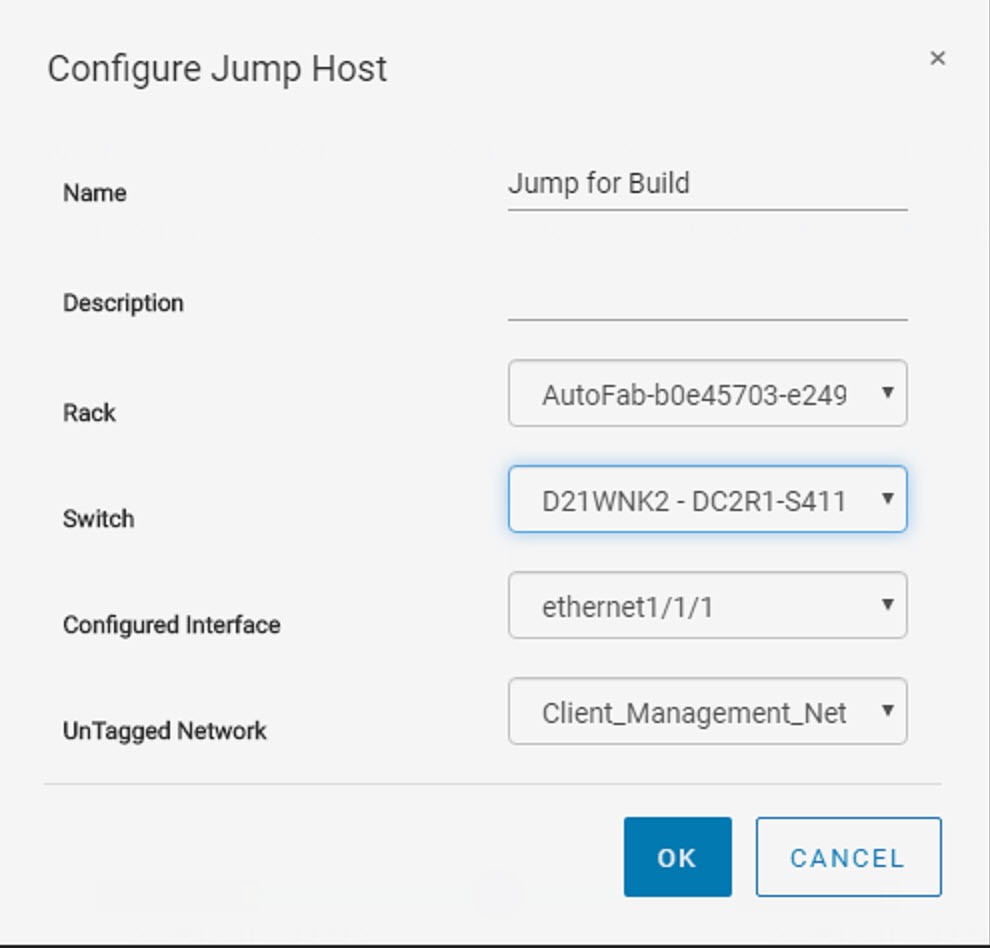
Configure Jump Port

The jump port is used to deploy VxRail by using a laptop to reach the default client control vlan where VxRail Manager is setup initially. The Jump port can now be selected on any port. This is much better than the last version that always selected port 0 as the default jump port.

Deploy VxRail on SmartFabric

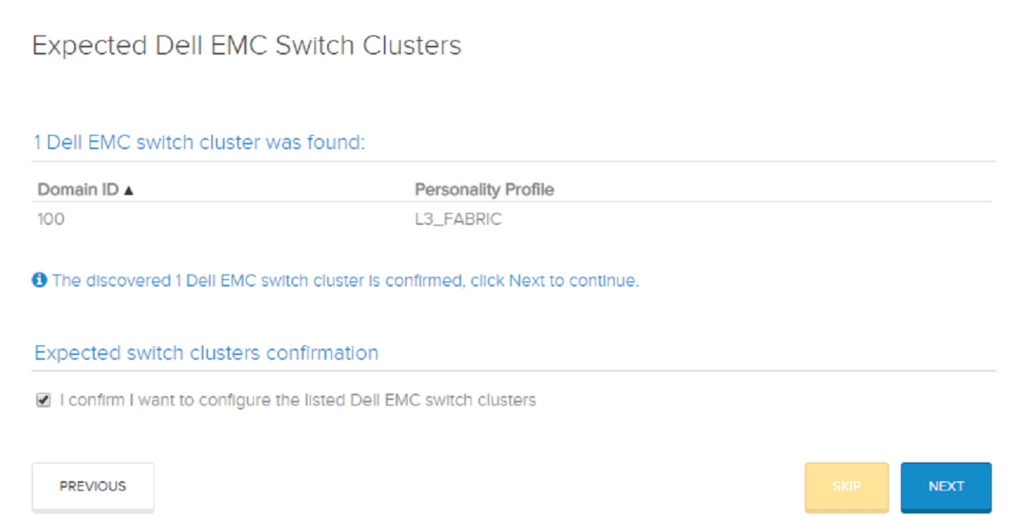
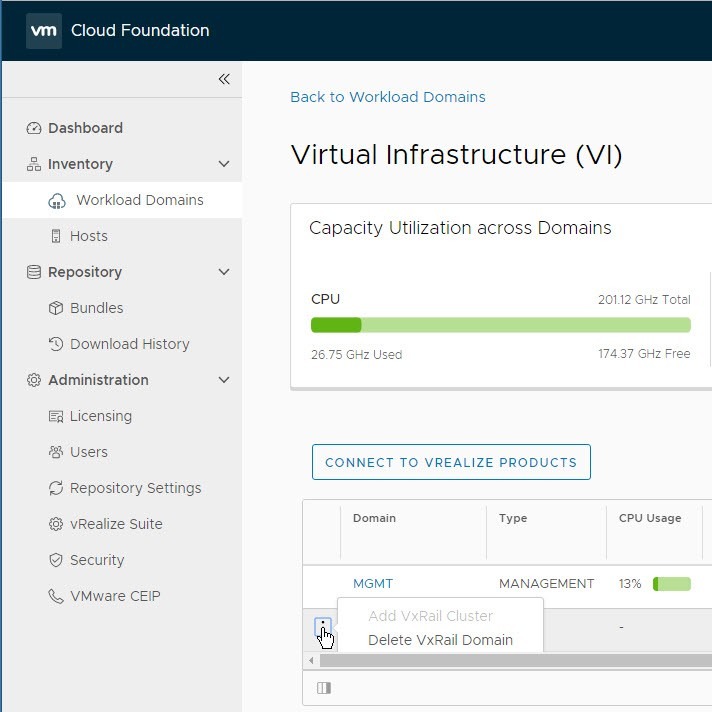
You can now deploy your first VxRail cluster into the SmartFabric enabled fabric. There will be one new step in the VxRail Manager deployment GUI. Once you confirm that you want to allow VxRail Manager to control the switch configuration, the rest of the setup is totally automated!

SmartFabric Services for VxRail latest Updates and Install Guide

Its been a little over a year since we launched SmartFabric Services for VxRail. This was initially a neat little solution for single rack deployments. We were the first in the industry to automate the entire HCI deployment. The vision was always to go beyond the Top of Rack and automate Leaf and Spine architectures as networking is still the challenge for HCI solutions. Now we have.

SmartFabric for VxRail New Features

  • Zero-Touch automated deployment of Leaf/Spine
  • Enhanced GUI for Leaf and Spine Personality Management
  • Single Rack or Multi Rack VxRail Cluster deployments in a single site
  • One or more VxRail Clusters connected to a single fabric
  • Ability to connect non VxRail devices to the fabric
  • Fabric expansion automation
  • Lifecycle management of Leaf/Spine from vSphere OMNI plugin
  • Switch replacement automation

I have been keeping a close eye on the release of this software as I wanted to get it setup to demo to customers at the Customer Solution Center. I also wanted to quickly get a out a new Blog series to replace the original one that was so popular with our Partners and the PreSales community.

So before we get started, lets review the latest supported versions of the new SmartFabric Services for Vxrail solution.

Supported Software versions

Link to InfoHub where the latest detail on supported versions and more!

Lets get started. Follow these Steps.

Getting SmartFabric for VxRail is now even easier than before and I am going to document the 4 Steps I followed to get it up and running in my lab.

Step 1 – Enable SmartFabric Services on OS10 Leaf switch

Note: This is not a guide for end user customers because a lot of what I write about is handled thru our automated deployment appliance by Partners or Services teams. So please proceed with caution.

Check that the OS10 version is EXACTLY 10.5.0.5

Login to the Leaf and Spine switches and check that they are running the correct supported version of OS10 for VxRail installs. If the version is not running OS10 version 10.5.0.5 (not older or newer) then please upgrade or downgrade. You can use this blog i wrote earlier to perform an upgrade or downgrade from the switch CLI.

Configure Leaf switch OOB Management.

Put an ip address on both of the Leaf switches before you enable the SmartFabric personality in the following step.

OS10# configure terminal
OS10(config)# interface mgmt 1/1/1
OS10 (conf-if-ma-1/1/1)# no ip address dhcp
OS10(conf-if-ma-1/1/1)# ip address 192.168.105.235/24
OS10 (conf-if-ma-1/1/1)# no shutdown
OS10(conf-if-ma-1/1/1)# exit
OS10(config)# management route 192.168.0.0/16 192.168.105.254
OS10(config)# end
OS10# write memory

Enable SmartFabric Services for VxRail on the Leaf and Spine.

OS10(config)# smartfabric l3fabric enable role LEAF vlti ethernet 1/1/14-1/1/15

We can also enable the Spine switches now. These are not required yet for the VxRail deployment so we will set them up later.

OS10(config)# smartfabric l3fabric enable role SPINE

When the SmartFabric Services for VxRail personality is applied, the switches will reload.

Verify SFS Cluster & verify the Master

OS10# show smartfabric personality

Personality :L3 Fabric
Role :LEAF
ICL :ethernet1/1/14, ethernet1/1/15


OS10# show smartfabric cluster

CLUSTER DOMAIN ID : 100
VIP : fde2:53ba:e9a0:cccc:0:5eff:fe00:1100
ROLE : MASTER
SERVICE-TAG : D21WNK2
MASTER-IPV4 : 192.168.105.235
PREFERRED-MASTER : true

Connect to SmartFabric GUI

Now we can connect to either Leaf OOB Management ip and access the GUI. If we know the Master IP – then use this URL to access GUI:

https://MASTER_IP_ADDRESS

The next blog will explain the new SmartFabric GUI and simplified VxRail deployment process. Stay Tuned.

Listen to Irish Photography Podcast

Covering the Dive Ireland EXPO 2020

Having dive buddies is nice. Having buddies that also take underwater images is nicer. Having a dive buddy that hosts a hugely popular photography podcast and will invite you on as a guest to promote the Dive Show is even better again!

What’s in Store at the Dive Ireland EXPO – Irish Photography Podcast

How to Upgrade SmartFabric OS10 via cli

Download the latest SmartFabric OS10 operating system.

Before we upgrade SmartFabric OS10 operating system on our switches we need to get the latest compatible OS10 version. The latest version of SmartFabric OS10 Enterprise Edition software is located on the Force10 Networks portal here. If you plan to upgrade SmartFabric OS10 with VxRail then you should consult the guide here. This matrix tracks the OS10 Switch Operating system version, OMNI plugin version and VxRail software that align.

Follow this guide to manually upgrade #DellNetworking OS10 operating system for the latest SmartFabric features. Click To Tweet

Show version

OS10# show version
Dell EMC Networking OS10-Enterprise
Copyright (c) 1999-2019 by Dell Inc. All Rights Reserved.
OS Version: 10.4.3.4
Build Version: 10.4.3.4.213
Build Time: 2019-06-10T09:54:17-0700
System Type: S4112F-ON
Architecture: x86_64
Up Time: 00:39:25

show switch-operating-mode

OS10# show switch-operating-mode

Switch-Operating-Mode : Full Switch Mode

Note that I was rebuilding a new SmartFabric VxRail cluster so I did not want to retain the existing switch configuration. I wanted to demonstrate installing VxRail and SmartFabric using the automated deployment on the latest hardware. By using the sfs_disable.py script – I am destroying the configuration of the existing switch.

Sudo sfs_disable.py

System bash
Sudo sfs_disable.py

image download via scp

OS10# image download scp://root:Password01@192.168.105.129/root/PKGS_OS10-Enterprise-10.5.0.5.661stretch-installer-x86_64.bin

Use ‘show image status‘ for updates

image install

OS10# image install image://PKGS_OS10-Enterprise-10.5.0.5.661stretch-installer-x86_64.bin

Image Upgrade State: install

Installation State: install

State Detail: In progress: Installing
Task Start: 2020-03-20T18:43:30Z
Task End: 0000-00-00T00:00:00Z

boot system standby

OS10# boot system standby

OS10# reload

show boot

OS10# show boot

Current system image information:

Type Boot Type Active Standby Next-Boot

Node-id 1 Flash Boot [A] 10.5.0.5 [B] 10.5.0.2 [A] active

write memory

OS10# write memory

show version

OS10# show version
Dell EMC Networking OS10 Enterprise
Copyright (c) 1999-2020 by Dell Inc. All Rights Reserved.
OS Version: 10.5.0.5
Build Version: 10.5.0.5.661
Build Time: 2020-02-15T00:45:32+0000
System Type: S4112F-ON
Architecture: x86_64
Up Time: 2 days 05:23:04

Next Step; Enable SmartFabric Personality

The next step once the switch is upgraded to 10.5.0.5 would be to enable the SmartFabric for VxRail personality. Follow this guide here.

VSAN Disk Group Validation Error in VxRail

Disk Group Validation “Host with all-flash disk types is not compatible with existing hybrid cluster”

I ran into an issue recently when I was building a new VxRail cluster that I had just re-imaged using the RASR process. The RASR tool is used by Partners and Services to automate the process of wiping a node back to factory default settings. The node I was using was an All-Flash node. I was adding it into an All-Flash cluster. I was perplexed when a validation error popped up during the node add process. Validation Errors. Disk group validation. Host with all-flash disk types is not compatible with existing hybrid cluster.

VxRail hosts validation errors disk group validation

Check if the RASR iso is still attached.

I had a flashback to a previous error I encountered with the RASR ISO. I was trying to build a new cluster with 3 nodes. One of the nodes needed to be reset to factory default. I used the RASR ISO by attaching it as bootable media through the iDRAC console. When the reset finished, I accidentally left the RASR ISO still attached as virtual media to the iDRAC. When VxRail manager tried to validate the 3 nodes, it picked up the RASR’d node as hybrid not all-flash. This prevented the validation from passing since the first 3 nodes in a VxRail cluster need to be identical.

idrac console connect virtual media

Check the ESXi console; Is SSD: True?

So I logged on to the iDRAC and checked the virtual media for an attached ISO. It wasn’t showing up this time. I decided to just take a quick look at the ESXi console to see if the disks were incorrectly detected as spinning.

esxcli vsan storage list

This will report back all the disks available for VxRail to configure for VSAN. The disks were all correctly reported as SSD. I was stumped. Something was causing the mis-alignment.

I had a bit of a brainwave. I had recently tested a custom RASR iso from the dev team that had a kixstart configuration. This ISO was a hands-off automated way of re-imaging the nodes from a batch file. It saved me a lot of manual steps by using an answer file for various prompts. I wonder was it somehow still mapped to the node?

I logged in to the iDRAC web interface and checked the “Attached Media” tab. There it was, still connected. Once I disconnected the RASR iso here the validation process passed. Huzzah!

Starting a vExpert Blog : Some tips and advice.

Just do it. Start a Blog. Today.

Stop procrastinating right now and start your vExpert Blog. This is the quickest way to get involved in the vCommunity. It doesn’t require any travel, and you don’t have to conquer your fear of public speaking. You only need to find a place to publicly share your ramblings and there is lots of choice there. From using a service like Medium, or publishing directly on LinkedIN you can get started almost immediately. If you want a little more control of where your content is hosted, then maybe starting a WordPress blog is for you. That’s what I ended up doing and I never looked back! Here is my advice on why I did it and some tips on the most useful Plugins i use for my vExpert Blog and why I use them.

Why I started a blog.

VMware vExpert

Why did I start writing a blog in the first place? The main reason I started a blog was to complete the #BlogtoberTech 2018 challenge. I had always threatened to start a blog and this gave me the motivation i needed to buckle down and get it done. Secondly I was looking for a way to publicly give back to the vCommunity in a way that was measurable. I wanted to include it in my vExpert application and improve my own personal brand. What I did not realize was how much I would enjoy doing it. I have found blogging to be a great tool for organizing my ideas, and capturing key concepts that i will later present to customers. Before i started blogging my ideas were lost on the back of napkins, buried in A4 diaries or spread out across multiple OneNote entries.

Blogging to help your presenting.

Strangely enough I find that blogging actually helps my public speaking. The best advice I ever got around how to give better presentations was to start with an agenda. I used to just get on stage and wing it. I was notorious for drifting from one idea to the next with very little structure and no beginning, middle or end in sight! If you get up in front of an audience, you only have a few seconds of attention span before their eyes start to glaze over and they get that far-away look. When you write or blog, your audience is similar, you just don’t see them when they get bored and click past! I find blogging is one way to organize my thoughts and to put some structure around my ideas.

Capture ideas in WordPress not OneNote.

I have started writing directly in WordPress. Once I started writing directly into WordPress I found it much easier and quicker to get the blog to published status. Write it and walk away, save it in drafts. Sometimes you will come back to it and delete it, other times you will finish it. The default WordPress editor interface is simple to use. You don’t want to get distracted with lots of tools for formatting and layout, just a quick way to get your ideas down on the page. Sometimes all you need to kickstart a new vExpert blog is editor time. There is a handy WordPress app for mobile devices that you can use when on the go.

5 Best Plugins for WordPress Blogs

There are a ton of free and paid WordPress plugins available in the marketplace. You can browse directly from the WordPress Admin console. They have lists of Featured, Popular and Recommended Plugins, or you can search for a topic and see what is out there. For example I needed an SSL cert solution for my WordPress site and I didn’t want to pay for a Certificate.

Free SSL Certificate for WordPress

Using this plugin you can finally setup your site to be secure. You may not be reaching all your audience if you don’t enable SSL as many browsers will not even let your readers in. This Plugin enables you to use the free Certificate Authority from LetsEncrypt.org. The process to request and renew certificates can be handled directly from the Plugin interface. It’s free to use, but the author gives you a button to donate coffee. No self respecting vExpert blog is complete without https!

JetPack by WordPress.com

This is a very powerful plugin for your WordPress site. It has features to help prevent unwanted spam, security against brute-force attacks and has site accelerator for serving your images through a global CDN. Some of the basic features are free but you can upgrade paid-for options as well. There are Personal, Premium and Professional options with different features.

reSmush.it Image Optimizer

Do you like to include pictures with your blog writing? Then I highly recommend using a plugin that will optimize your images. reSmush.it is a free plugin that automatically compresses your images so that your site doesn’t start to crawl. If it takes too long for your blog to load, then your visitors will not hang around waiting.

Yoast SEO

Even if you are a total novice and have no idea what SEO is – you are going to want this plugin. Search Engine Optimization is a vast topic. Some people make their living providing services to help websites rank highest in searches. You don’t have to spend hours keeping up with the latest techniques if you install Yoast. The plugin will make suggestions and recommendations on how to simply improve your content. This will help to get that blog ranking to the first page in google search results. Must have!

Google Analytics Dashboard for WP

How can you improve if you don’t measure? I use both JetPack and Google Analytics to report on my blog site traffic. The detail that google provides is immense and lets face it – if you don’t show up there than it is very unlikely your blog is going to ever be read by anyone! Using a combination of Yoast and Google Analytics you can even write blogs to target specific search terms from your audience. This is a great way to get noticed.

VxRail Error Codes reference

Download the VxRail error codes guide.

Last week a customer asked me about some of the alarms showing up in vSphere on their VxRail hosts in VMware vCenter. The alarms were actually generated by VxRail manager and are VxRail error codes unique to the HCI appliance. VxRail Manager uses these codes to highlight any insights at the hardware, hyper-visor or software layer of the integrated appliance. The codes start with VXR in the description.

VxRail Event Code Reference document
Download the VxRail Event Codes Reference Guide PDF

This customer wanted access to details around these event codes and error codes that appeared in vSphere. I shared a link to a document that contains all the VxRail appliance event codes. This document is regularly updated and publicly available here. The document is titled the VxRail appliance event code reference. These include the events for vCenter, iDRAC, SRS, the VxRail appliance and VxRail Manager.

Setup SRS and ACE for the best experience

The error codes will be used to phone home to Dell EMC support through SRS (Secure Remote Support). SRS is able to automatically create an SR (Service Request) for any issues that may be more serious in nature. Customers that have SRS installed will enjoy faster time to resolution for issues that require support from Dell EMC.

This customer was not using the latest version of VxRail software (4.7.300 at time of writing). I encouraged the customer to take advantage of both SRS and ACE. This makes it much easier to monitor and manage multiple clusters. There are also improvements to VxRail error and event code handling in the latest code.

The VxDoctor is in the house.

The latest update to VxRail in the 4.7.300 code includes a new framework for intelligent event handling. This new engine will gather alerts generated and perform logic to either report or dismiss. Only the important events will be forwarded to support. The logic will suppress any benign events to avoid unnecessary SR creation. This event throttling capability will determine if the event can be self-healed first. If self-healing is not possible than a smart logging feature will kick in. It will gather the correct logs required for this specific issue, rather than all logs on the system.

Customers that choose the VxRail appliance see the value that automation brings to infrastructure management. Intelligent appliances are replacing the need for DIY infrastructure. that gives a public-cloud-like experience. Systems that are designed with the principal of SRE are the new normal. Using VxRail and ACE together with SRS a customer can more quickly achieve a cost-effective and reliable on-premises infrastructure.

VxRail ACE in Continuous Development

New VxRail ACE features arriving fast and often

Did you know that VxRail ACE dashboard has had 4 updates since the soft launch in May this year? As customers log into the Ace dashboard they are first presented with the latest updates that have been released since their last visit. So far there is roughly a monthly cadence between updates. This rapid development is down to the ACE solution being built on the Pivotal platform. Since the soft launch of VxRail ACE in I have been talking to customers about ACE and showing off this first phase of capabilities. Have you had the chance to check out ACE yet?

Customers dont need to install ACE, the data lake is on our side.

A big advantage for customers is that the ACE Data lake sits on our infrastructure. The customer requires no resources to collect and process the data. This data lake is swelled by the 6200+ customers of VxRail. We want to enable as many customers to use ACE since more data gives better results. The next phases of ACE will begin to introduce AI technologies like machine learning. This will give customers options to have VxRail self-drive and auto-repair their clusters.

How do i setup VxRail ACE?

Getting connected to ACE is even easier with the 4.7.300 update for VXRail . We now can deploy SRS directly in vSphere with just a few clicks. Customers need a Dell EMC support logon and the plugin will auto deploy the srs appliance in seconds. Just provide the Support account credentials and an ip address for the SRS appliance(s). The new appliance will be deployed in the VxRail cluster. You can still point SRS at an existing external SRS appliance that is already running in your network.

Dell EMC Secure Remote Support SRS

Remind me. What is VxRail ACE?

How can customers take advantage of new technologies without requiring a heavy lift on their internal IT resources? Firstly offer an appliance rather then DIY build for infrastructure helps (VxRail). Then give customers a choice to subscribe to premium services that add value beyond the simplified HCI experience. “VxRail ACE (Analytical Consulting Engine) is a centralized data collection and analytics platform that streamlines monitoring of your VxRail clusters, improves serviceability, and helps you make better decisions to manage the performance and capacity of your pre-engineered hyperconverged infrastructure. ” – From the ACE overview.

Deleting a Workload Domain in VCF on VxRail

Warning: Check Solve before reading.

This Blog comes with a health warning! This is not to be consumed by customers directly. This is not a procedure for them to use in VCF on VxRail environments at this time. I wrote this as a reminder to myself and for other engineers that might need to perform the task in demo or POC environments. Always check Solve Online and download the current procedure for any tasks you might want to perform. If there isnt a procedure to perform the tasks in Solve then you may need to check if you are authorized to perform the task.

Always check Solve Online for the correct procedure for any tasks. If its not listed, you many not be authorized to perform the task!

VCF on VxRail is a white glove experience.

One of the advantages of using VxRail as the infrastructure for VMware Cloud Foundation (VCF on VxRail) is the simplified and automated processes that the engineered appliance brings to bear. This solution is a white glove experience for customers as only qualified and experienced installers perform the Day Zero deployment activities. Configuration is automated and validated to remove the chance of human error. Once VCF is deployed, many of the manual tasks that could be difficult are automated by SDDC Manager. Deleting a Workload Domain is one of those workflows.

Once a Workload Domain is deployed, you will see the option to Delete the Workload Domain, ever wondered what this does?

Warning! Deleting a WLD is permanent.

Once you select the Delete Workload Domain workflow from the current inventory, you are presented with a popup warning. I highly recommend you read carefully exactly what this message says as the process is irreversible. As the warning suggests the entire Workload Domain will be removed and deleted. This includes VSAN as well as the vCenter and NSX Manager and NSX Controllers associated with this Workload Domain.

Don’t click past this warning message!

VxRail Makes LCM Great (Again)

VxRail LCM updates are a huge differentiation to any other HCI competitor since it includes the entire stack in a single bundle file; Hardware, hyper-visor and software on top!

New LCM Changes for VxRail in 4.7.300.

There is now a new Updates Tab for VxRail LCM (Life Cycle Management). I gave this feedback way back when the first HTML5 plugin for VxRail came out. The link to check for updates was tiny and easily missed hidden away in the System tab. VxRail LCM updates are a huge differentiation to any other HCI competitor since it includes the entire stack in a single bundle file; Hardware, hyper-visor and software on top! I wrote previously about the VxRail LCM process and why it matters to HCI solutions here.

Aaron Buley was quicker than me in digging into the latest LCM improvements.

Updates Tab embedded in H5 client

The new Updates tab integrated in vSphere H5 client. So much nicer and easier to find!

The update tab gives you quick access to view the current version of ESX, vCenter and the VxRail Manager itself. The tab for Internet Upgrade is here, where you can automatically pull the latest bundle. VxRail Manager will check for VxRail LCM bundles and alert you when its available.

Applying a local bundle in offline mode.

Schedule updates and find out how long they will take.

You do not have to be online to update the cluster, you may be required to run the cluster as a dark site and manually apply updates in the Local Updates tab. This is also a great way to control which bundle you want to apply rather than take the most recent version. Some customers prefer to plan updates in a more controlled manner, and stay a version or two behind.

it is now possible to schedule an update to run in future right from the GUI interface. This means you have time to plan an update to happen out of hours and you dont have to be there to kick it off. Customers were also asking for a way to estimate how long a bundle update would take. This is built in now as well showing Minimum Estimated Time.

You can change a scheduled update or even cancel it from the GUI.

What else changed in the VxRail Plugin?

Convert vCenter Mode in GUI form…

The System Tab now has an option to “Convert vCenter mode”. There was a Script available to externalize an embedded vCenter running in VxRail already, but now its built in the GUI. This is super useful for example when customer wants to convert the VC and PSC and connect multiple VxRails to a mgmt cluster. This aligns the deployment with the VVD automatically allowing them to stay fully compliant.

easy button for externalizing the VC and PSC deployed in VxRail.

Simple SSL Certificate Management

There is a new SSL certificate tab in the VxRail plugin. This allows you to easily replace the VxRail Manager SSL Certificate.

Multi-Rack discovery using a proxy node.

There is a feature in VxRail hosts tab to expand an existing cluster to another rack with new unassigned VxRail nodes. The new rack will have its own TOR switches and may be seperated by a different VLAN to the existing cluster.

Its a simple task to declare one of the unassigned nodes to act as a proxy node using this CMD:

esxcli network ip interface ipv4 set -i vmk2 -I <Management IP Address> -N <subnet mask> -t static

Use the GUI as below to declare this new proxy at the cluster. The proxy node will transmit details of all unassigned nodes in the 2nd rack. Proceed to expand cluster by adding these new nodes as before.

ACE gets top billing now.

If you don’t know what ACE is all about yet, then pop over to this blog i wrote earlier explaining all about it. ACE is getting new updates every couple weeks now (its running on the Pivotal engine so you know its going to be adding new features fast! There is a link to the ACE FAQ in the Support Tab so that customers can quickly get connected and up and running. ACE is still free for customers.

Traffic throttle between VxRail and vCenter

Physical View of appliances now in H5!

No longer do we need to link and launch to access the Physical View of our VxRail appliance nodes. Everything is embedded in the HTML5 interface. My good buddy Jeremy Merrill wrote up an excellent blog already detailing this why not check it out.

error

Enjoy this blog? Please spread the word :)